1 Introduction to program control flow
Contents
1 Introduction to program control flow
Loops and branches are powerful constructs in programming, and they are used extensively in almost all computer programs. In this session, I will introduce the different loop and branch statements provided by RoboLab. You will have an opportunity to see how they are used by working through the activities. We end the session with a number of challenges for you to attempt. These will give you practice in selecting and using different RoboLab statements.
In particular, this notebook will focus on loops and the next notebook on branches. Two further notebooks will provide you with a series of challenges to help develop your understanding of how these sorts of constructs can be used in the context of some simple robot programming tasks.
1.1 An introduction to loops in computer programs
To illustrate the idea of a loop it is helpful to use a swimming analogy.
Suppose you want to swim 20 lengths of a swimming pool. The chances are, you will want to monitor your progress by keeping count of the number of lengths you complete. A flowchart can be used to provide a visual representation of the steps (which is to say, the algorithm), involved in keeping track of how many steps you have completed.

At the start, your personal counter (you) will be set to ‘0’.
After swimming a length of the pool you add 1 to your counter. You also ask yourself ‘have I done less than 20 lengths?’ If the answer is ‘yes’, then you ‘loop back’ to swim another length.
On completion of the second length you add 1 to your counter and ask yourself the question again. If the answer is ‘yes’, then you loop back and repeat the process once more.
You keep going like this until the answer to the question is ‘no’, at which point you will have completed 20 lengths of the pool and the loop will end.
As another example, consider a person ironing clothes, taking clothes out of the laundry basket, ironing them and then putting them on an ironed clothes pile:
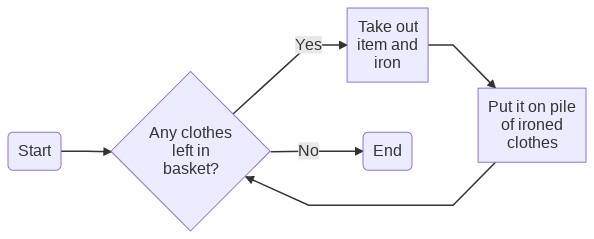
The loop starts with the person looking in the basket. Then a decision has to be made: are there any clothes left? If there are, the person must go round the loop: take out an item and iron it, put it on the pile of ironed clothes, and look in the basket again. When there are no clothes left in the basket the loop ends.
The flowchart diagrams used in this notebook were generated from textual descriptions of them using an application called mermaid.js. Click on the image to view an editor that shows how the diagram was constructed.
As you have seen, a sequential computer program is a sequence of lines of encoded commands, to be executed one after the other.
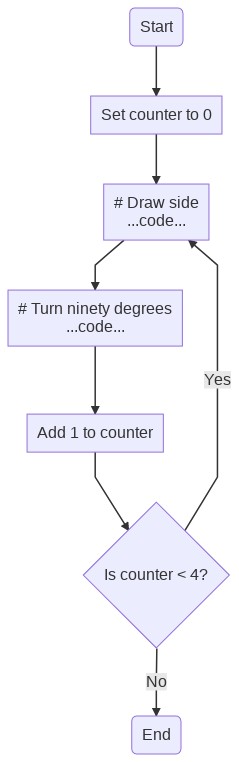
For example, the program to move a robot around a square course consisted of the following sequence of instructions repeated four times:
# Draw side
tank_drive.on_for_seconds(SIDE_SPEED, SIDE_SPEED, SIDE_TIME)

# Turn ninety degrees
tank_turn.on_for_rotations(STEERING, TURN_SPEED, TURN_ROTATIONS)
How much easier would it be just to give these commands once, and tell the computer to loop back to the start, repeating until the instructions have been executed four times?
Python gives you two main ways of implementing loops:
a
for...in...loopa
while...loop.
The for...in... loop checks the status of an iterator, which is capable of returning items from a list of values, one at a time. If the list is empty, then the looping ends. If the iterator is not empty, then the program flow passes to the first instruction inside the for...in... code block; otherwise it passes to the next instruction at the same block (indentation) level as the for...in... statement.
The while... loop tests the truth value of a statement. If the statement evaluates as True, then the program flow passes into the body of the loop; otherwise it proceeds to the next statement at the same block (indentation) level as the while... statement.
Let’s see how each of these constructs works in turn, first using a simple, pure Python example, then in the context of our simulated robot.
1.2 Using a for...in... loop
A for...in... loop takes each item from a list of items (or a more general Python iterator object), one at a time, then enters the loop, until the list (or iterator) is empty.
In ‘pseudo-code’ (that is, a human-readable set of instructions that look like a form of stylised code), the for...in... loop behaves as follows:
for each item in turn in a list of items, do the following sequence of instructions

  {

  instruction 1

  instruction 2

  instruction 3

  etc.

  }
Note that any of the instructions inside the loop may make use of the current value of the item that has just been retrieved from the list.
When the loop has finished, the value of the last item retrieved from the list will continue to be available.
Run the following code cell to see how the for...in... loop retrieves one item at a time from a list of items (line 1), enters the code block within the loop starting at line 2, executes each line 2–3 in turn, then returns to line 1 to get the next item from the list.
When all the items have been retrieved from the list, the program flow moves on to the next item at the same indentation as the for...in... loop, which is line 4:
for item in ['one', 'two', 'three', 'fish']:
    print(item)
    print(' and ')

print('All done...')
It is also worth noting that the value of the item variable is the value of the last item to be retrieved from the list, as you can see if you display the value by running the following code cell:
item
We can use the nbtutor extension to step through the program execution to see what exactly is going on.
Run the following code cell to load in the nbtutor magic:
%reload_ext nbtutor
The %%nbtutor cell block magic can be used to prefix Python code we want to step through, but not code intended for the simulator.
One thing to note about the notebook environment is that if we have already created any Python variables in the current notebook, then they will be displayed by default in the %%nbtutor visualisation.
We can limit the variables that are displayed by nbtutor by calling the magic using the command %%nbtutor --reset --force.
Run the following code cell to invoke the nbtutor widget, and then use the Next > button in the cell toolbar that is created to step through each line of code in turn.
Observe the progress of the control flow through the code via the two differently coloured arrows that show the next line to be executed (red line) and the previously executed line (green arrow). Also notice how the statement previously executed may update the value of the item variable as a consequence of its execution.
%%nbtutor --reset --force
for item in ['one', 'two', 'three', 'fish']:
    print(item)
    print(' and ')

print('All done...')
Did you notice how the program flow repeatedly went from the last line of the code inside the for...in... block back up to the for...in... statement, before going from the for...in... statement to the final print('All done...') statement when the loop had iterated through all the items in the list?
Close the nbtutor cell toolbar view by clicking on the notebook toolbar View menu option, and from the Cell Toolbar option select None.
1.3 Using print() and display() statements to help debug a program
As well as using the nbtutor to help us see what’s going on in the loop as it executes within the notebook, we can also use print() and display() statements to display the value of one or more variables as the loop executes.
Python f-strings (‘formatted strings’ or ‘formatted string literals’) also provide a convenient way of getting the value of a variable into a string. For example, if you have a variable day_of_week = "Monday", we can display a message using the construction print(f"Today is {day_of_week}"). The f"..." construction denotes the f-string. The curly brace brackets ({..}) contain the name of a variable whose value you want to substitute into the string.
Note that f-strings and the use of the display() function are not available in the RoboLab simulator’s Python implementation. In such cases, you can print several variables and strings at once by using commas in the print statement (e.g. print('Today is', day_of_week)*
1.3.1 Activity – Writing out days of the week
See if you can write a simple program that loops through a list of days of the week and prints out a message of the form ‘Day 1 is Monday’ followed by ‘Day 2 is Tuesday’, and so on.
# YOUR CODE HERE
Example solution
Click on the arrow in the sidebar or run this cell to reveal an example solution.
There are several ways in which we could implement the code to perform this task.
For example, in the following worked example, I created a counter value (counter = 0) and then used a for...in... loop to iterate through a list containing the names of the days of the week.
The code to be executed by the loop was ‘nested’ inside it as a code block by indenting the code I wanted to execute within the loop.
Inside the loop, I incremented a counter (counter = counter + 1), then displayed the required message using a simple print() statement:
counter = 0

for day in ['Monday', 'Tuesday', 'Wednesday',
            'Thursday', 'Friday', 'Saturday', 'Sunday']:

    counter = counter + 1

    print("Day", counter, "is", day)
The following code example performs the same task, but implemented in a slightly different way.
In particular, I first declare a variable (days_of_week) to refer to the list of the days of the week, and then iterate over the list as referred to by the variable in the loop.
Within the loop, I use a shorthand construction counter += 1 that essentially says: update the value of the counter variable to its current value plus 1.
Finally, I have used a Python f-string to print the message on each iteration through the loop:
counter = 0

days_of_week = ['Monday', 'Tuesday', 'Wednesday',
            'Thursday', 'Friday', 'Saturday', 'Sunday']

for day in days_of_week:

    counter += 1

    print(f"Day {counter} is {day}")
Using loops in code intended to be downloaded and run in the simulator
If you use a loop in code you want to download to the simulator, then you need to put something in the loop that ‘uses up’ simulator time and allows its internal clock to proceed; otherwise you may find that your simulator Python program gets stuck and ‘hangs’ your web browser.
Turning motors on for a specified time or rotation count, or polling sensors, is one way to do this. Another way is to add an explicit delay into the loop. For example, if you add the line from time import sleep to the start of your simulator program, then you can add a step sleep(0.01) to pause in the loop for one hundredth of a second. This gives the simulator a chance to model the progress of time in the simulated world, rather than getting stuck in a very rapidly iterating loop in the code it’s trying to execute.
1.4 Robots that can count
At the end of the last notebook, you saw how we can get the simulated robot to speak a simple message using the say() function provided by the %%sim_magic_preloaded magic.
Load in the simulator and enable the simulator magic:
from nbev3devsim.load_nbev3devwidget import roboSim, eds

%load_ext nbev3devsim
And let’s hear what the robot has to say:
%%sim_magic_preloaded -HWR

say("Hello again")
But can we get it to do something more elaborate?
How about counting up from 1 to 5?
1.4.1 The Python range() function
The Python range() function can be used to generate an iterator (a loopy thing…) over a series of integers that cover a certain range:
range(5)
We can enumerate the contents of an enumerator by casting it to an explicit list of values:
list(range(5))
We can use a for loop to iterate through the range, displaying each value within the range using a print() statement:
for i in range(5):
    print(i)
If we supply just a single value to the range() function, as in range(N), it defines a range that spans from \(0\) to \(N-1\).
M = 5

list(range(M))
If we provide two arguments, range(M, N), it defines a range from \(M\) to \(N-1\):
M = 5
N = 10

list(range(M, N))
If we provide three arguments, range(M, N, S), it spans a range of integers from \(M\) to \(N-1\) with a step value \(S\) between them:
M = 0
N = 30
S = 10

list(range(M, N, S))
If we set \(M=0\), \(N=30\) and \(S=10\), the first value returned from the range is the initial start value, \(0\).
We then add a step of \(10\) to get the next value (\(10\)).
Adding another step of \(10\) gives us the next number in the range: \(20\).
If we now try to add another \(10\), that gives us a total of \(30\), which is outside the upper range of \(N-1\), and so that number is not returned as within the range.
Now let’s see if we can get our robot to count up to five in the simulator.
Run the following code cell to download the program to the simulator and then run it in the simulator. What happens? Does the robot count up to five?
%%sim_magic_preloaded -HWR

# I can count...

for i in range(5):
    say(i)
Although we set the range value as \(5\), remember that this means the robot will count, by default, from \(0\) in steps of \(1\) to \(N-1\). So the robot will count \(0, 1, 2, 3, 4\), as we can see if we explicitly enumerate the values created by the range() statement:
list(range(5))
1.4.2 Modular division
We can also count in other numbers by counting in ones. The Python INTEGER % INTEGER operator returns the remainder from dividing the first number by the second:
for i in range(8):
    print(f"{i} % 4 gives remainder {i % 4}")
The truth value of 0 is False, and for all positive numbers is True. So 5 % 5 is 0 which evaluates as False. But if we test a value not (5 % 5), then it evaluates as True:
not (5 % 5)
This means we can count fives as follows:
for i in range(50):
    if not ( i % 5 ) and i > 0:
        print(i)
We can use this approach to limit when we print messages to the simulator Output display, for example, to once every five or ten passes through a control loop.
If you would like to hear your robot count aloud from within the notebook’s own Python code cells, the 99.4 Speaking in Python notebook in the 99. Technical Appendices notebook directory describes a possible way of supporting the speaking ability.
1.4.3 Activity – A counting robot
In the following code cell, create a range() statement that will create a list of numbers from \(1\) to \(5\) inclusive. Use a list() statement to generate a list from the range() statement.
Run the code cell to display the result so you can check your answer:
# Display a list of values [1, 2, 3, 4, 5] created from a single range() statement

# YOUR CODE HERE
Now create a program that will cause the simulated robot to count from 1 to 5 inclusive.
Run the cell to download the program to the simulator, and then run it in the simulator. Does it behave as you expected?
%%sim_magic
# Count from 1 to 5 inclusive

# ADD YOUR CODE HERE
Can you modify your program so that it counts from ten to one hundred, inclusive, in tens (so, ten, twenty, …, one hundred)?
Example solution
Click the arrow in the sidebar or run this cell to reveal an example solution.
We can display a range of values from \(1\) to \(5\) inclusive by using a range command of the form range(M, N) where M=1, the initial value, and \(N=5+1\), since the range spans to a maximum value less than or equal to \(N-1\):
list(range(1, 6))
We can now create a program that counts from one to five inclusive:
%%sim_magic_preloaded -HWR

# I can count from one to five inclusive...

start_value = 1
end_value = 5

# To get the desired final value,
# it must be within the range
# So make the range one more
# than the desired final value
for i in range(start_value, end_value+1):
    say(str(i))
To count from ten to one hundred in tens, we need to add an additional step value as well as the range limit values:
%%sim_magic_preloaded -HWR
# I can count from ten to one hundred in tens...

start_value = 10
end_value = 100 + 1
step_value = 10

for i in range(start_value, end_value, step_value):
    say(i)
1.5 Using a for...in... loop in a robot control program
Loops are very useful when it comes to executing repetitive tasks. In this section, you will see how we can use a loop in a simple robot control program.
You may remember from the program we used to draw a square that there was a lot of repeated code, with the same code used to draw a single side and then turn through a right angle repeated four times each. At the time, you may have thought ‘there must be a better way than this?’. The use of a loop provides just such a better way.
Look through the code in the code cell below and predict what you think the robot will do when it runs that program.
The magic used to configure the simulator specifies the robot location (-x/-y), orientation angle (-a), pen down mode (-p) and cleared trace (-C).
Double-click this cell to edit it and enter your prediction of what the robot will do as it runs through the program.
%%sim_magic_preloaded -b Empty_Map -a 0 -p -C

# Draw something...
for count in range(3):

    # Go straight
    # Set the left and right motors in a forward direction
    # and run for 1 rotation
    tank_drive.on_for_rotations(SpeedPercent(50),
                                SpeedPercent(50), 1)

    # Turn
    # Set the robot to turn on the spot
    # and run for a certain number of rotations
    # *of the wheels*
    tank_turn.on_for_rotations(-100,
                               SpeedPercent(75), 1.62) <!-- JD:  1.6.2 isn't a number; I suspect 1.62 was intended (and seems to work OK). -->
Now run the code cell to download the program to the robot. With the pen trace enabled, run the program in the simulator and observe what happens. Was your prediction correct?
Modify the program (if necessary…) so that the robot will trace out something close to a square (don’t spend too much time trying to make it perfect: that may not be possible!). Clear the trace in the simulator, reset the robot location, and download and run the program again to check your program modification worked.
1.6 Returning to the top of a loop early
Sometimes we may want to return to the top of a loop from within a loop code block before we have executed all the lines in the looped block. We can do this using the continue instruction.
Run the following code cell and step through each line of code a line at a time using the nbtutor Next > button. Watch the program flow particularly closely when the item variable takes the value three.
%%nbtutor --reset --force
for item in ['one', 'two', 'three', 'fish', 'four']:
    print(item)
    if item=='three':
        continue
    print(' and ')

print('All done...')
You should see that the item variable is updated to each item one, two, three, fish and four in turn. As the program iterates through the loop, the current value of the item variable is displayed. The value of the item variable is checked, and if it does not equal three the loop continues by displaying the word and, giving a message that builds up as one and two and three.
However, when the value of item does match three, the continue statement is run and control passes back to the top of the loop before printing the word and; in this case, that means the next word in the list, fish, is printed after the word three, giving the output message one and two and three fish.
The loop continues to operate as before and the final message that is displayed is one and two and three fish and four.
Note that a bug currently prevents us from downloading further programs to the simulator if we run nbtutor after opening the simulator widget.
1.7 Conditional tests using the conditional construct, if...
In the previous program, you may have noticed another new statement: an if statement. This is another sort of conditional statement. The if statement will test a logical condition and if it evaluates as True, then the program flow will pass to any statements contained within the if statement block.
if LOGICAL_TEST_STATEMENT:
    # If the LOGICAL_TEST_STATEMENT evaluates as True
    # run the following command
    print('The statement was True...')

print("This will always be printed...")
In and of itself, the if statement is tested once and once only. If the conditional test passes (evaluates as true), then control flows into the body of the if statement and then on to the next statement after the if construct. If the conditional test evaluates as false, then control passes immediately to the next statement after the if block.
In the if statement, the == sign is used to test whether the value of the thing on the left is the same as the value of the thing on the right.
So the following is True:
1 == 1
because numeric 1 does indeed equal numeric 1. However, the following evaluates as False because numeric 1 does not equal the string one:
1 == 'one'
The following is also False because the numeric value 1 is not the same as the string value '1':
1 == '1'
However, the following string values are equivalent even though we used different string delimiters (single quotes in the first case, double quotes in the second) to create them:
'1' == "1"
As well as using the == operator to test for equivalence, we can also use a range of other operators. For example:
X != Y: returnsTrueif a string or numerical valueXis not equal toYX > Y: returnsTrueif a numerical valueXis strictly greater than a numerical valueYX < Y: returnsTrueif a numerical valueXis strictly less than a numerical valueYX >= Y: returnsTrueif a numerical valueXis greater than or equal to a numerical valueYX <= Y: returnsTrueif a numerical valueXis less than or equal to a numerical valueY.
Try experimenting with you own equivalent, or inequivalent, statements in the code cell below.
Feel free to create more code cells if you want to keep a record of things you have tried. Or comment out each line after you have tried it if you want to try multiple statements in the same code cell.
# TRY SOME EQUIVALENT AND UNEQUIVALENT STATEMENTS OF YOUR OWN HERE
1.7.1 Activity – Using a continue statement
Suppose Wednesday is early closing day for shops. Building on elements from your earlier program that displays the days of the week, modify the program to use a continue statement so that it prints out the message I could go shopping on DAY afternoon for every day except Wednesday.
# YOUR ANSWER HERE
Example solution
Click on the arrow in the sidebar to reveal an example solution.
I used a simple if statement to check if it was Wednesday. If it was, then the continue statement passed the program control flow back to the top of the loop before the program had a chance to print out that day of the week.
for day in ['Monday', 'Tuesday', 'Wednesday',
            'Thursday', 'Friday', 'Saturday', 'Sunday']:

    if day=='Wednesday':
        continue
    print(f"I could go shopping on {day} afternoon.")
1.8 Escaping from a loop early
As well as returning back to the top of a loop early using a continue statement, we may sometimes want to escape from a loop altogether before the loop would normally finish. We can achieve this using the break statement, which breaks the control flow out of a loop when it is encountered.
Run the following code cell, stepping through it a line at a time, again paying particularly close attention when the item variable has the value three:
%%nbtutor --reset --force
for item in ['one', 'two', 'three', 'fish']:
    print(item)
    if item=='three':
        break
    print(' and ')

print('All done...')
1.8.1 Activity – Using break to escape from a for...in... loop
Suppose we get weekends off. Using a break construct inside a for...in... loop, create a simple program that takes a list containing the days of the week in order Monday…Sunday and displays the message DAY is a workday… for days Monday to Friday, but then breaks out of the loop when it realises it is Friday.
# YOUR CODE HERE
Example solution
Click on the arrow in the sidebar or run this cell to reveal an example solution.
In this case, I display the print message before I break out of the loop using the break statement:
for day in ['Monday', 'Tuesday', 'Wednesday',
            'Thursday', 'Friday', 'Saturday', 'Sunday']:
    print(f"{day} is a workday.")
    if day=='Friday':
        break
1.9 Summary
In this notebook, you have seen how we can use the nbtutor extension to step through and monitor the flow of simple Python programs executing in the notebook’s Python environment (unfortunately, it does not allow us to step through code we download into the simulator and breaks program downloads to the simulator widget after using the tutor).
At a programming level, you have seen how we can control the way in which program statements are executed in a program by using a for...in... loop to control a program’s execution flow. The for...in... loop allows a program to work through a set of statements in the loop body once for each item in a list of values or ‘iterator’ construct. Using the range() function, you were able to iterate through a loop a specified number of times.
You also met another flow control statement: the if... command. The if command is a conditional operator that checks a logical condition once and once only: if the tested condition evaluates as true, then control passes inside the block, and then continues after the if block; if the condition evaluates as false, then control passes immediately to the statement after the if block. (You will meet the if command in even more detail in a later notebook…)
The conditional if statement can be used within a for loop to interrupt the control flow within the loop either by foreshortening code execution within the loop (continue) or breaking out of the loop (break):
continueprematurely forces the flow of control back to the top of the loop, rather than requiring all the instructions in the loop to execute and then passing control back to the top of the loopbreakprematurely forces the flow of control out of the loop to the next statement after the loop block, rather than requiring control to be passed following the failure of the conditional test at the top of the loop.
Control flow instructions are part of the core Python language and are used in a similar way inside the simulator and the ‘native’ notebook Python environment.
In the next notebook, you will meet another form of loop control that combines loop execution with an inbuilt conditional test: the while loop.