3 The RoboLab simulated on-screen robot (nbev3devsim)
Contents
3 The RoboLab simulated on-screen robot (nbev3devsim)
Within the Jupyter notebook environment, you will be making use of a simple two-dimensional robot simulator, nbev3devsim. At times, we will refer to the Jupyter notebook + nbev3devsim simulator, or just the simulator itself, as RoboLab (it’s somewhat easier to say than nbev3devsim!).
3.1 The nbev3devsim simulator
The nbev3devsim simulator, which will be the focus of many of the programming activities in this block, is derived from a simpler web-based simulator – the ev3devsim robot simulator.
ev3devsim itself was inspired by the need to create a simulator for testing Python programs written for ev3dev, ‘a Debian Linux-based operating system that runs on several LEGO® MINDSTORMS compatible platforms including the LEGO® MINDSTORMS EV3 and Raspberry Pi-powered BrickPi.’
Rather than saving programs to separate files, each individual robot simulator program is defined within its own notebook code cell, and can then be ‘downloaded’ to the simulated robot. This means you can keep track of a how a program develops by writing each version of a program in its own code cell.
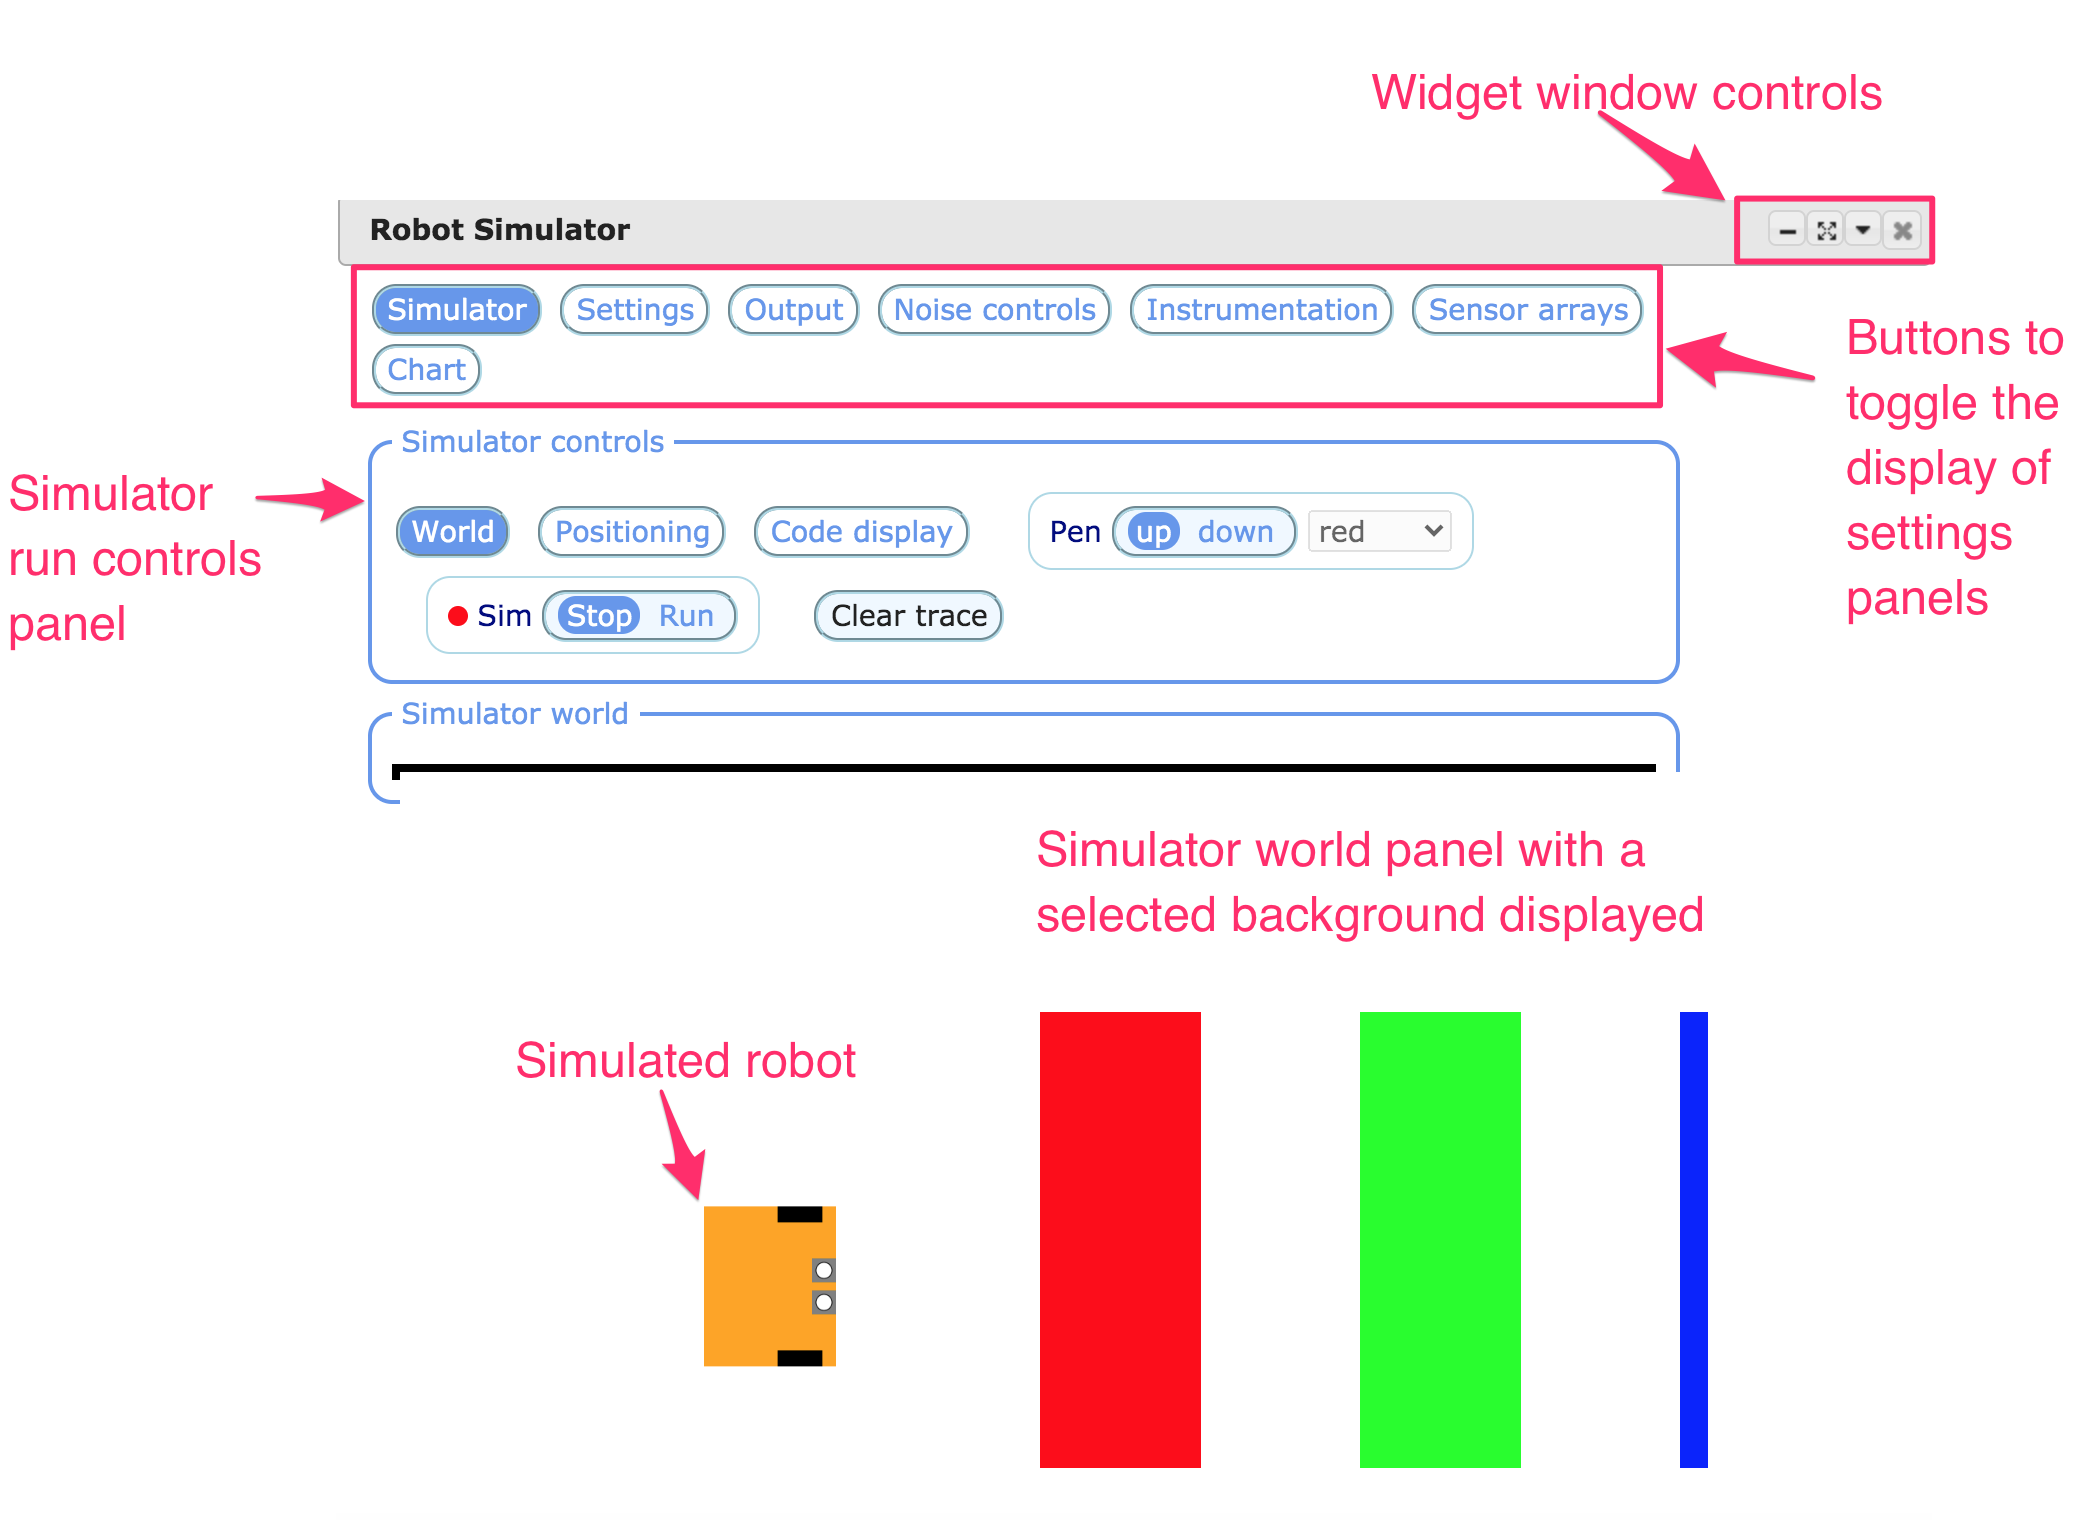
Many predefined worlds are available that can be loaded into the simulator, as image files, from a drop-down menu. (Source code for generating the background image files is also available in a notebook in the backgrounds/ directory.) When some worlds are loaded in, the robot’s initial (default) location in that world is also specified; other robot settings, such as the positioning of the sensors, may also be initialised when a particular background is loaded.
Obstacles can be added to a world using a configuration file opened by clicking the Obstacles config button in the simulator Settings panel. The simulated robot is also still configured via a configuration panel.
The simulated robot can be dragged and placed on the simulated background or moved over and rotated within the simulator world using slider widgets. The Reset button will move the robot back to its default location in the world.
3.2 The EV3 ‘brick’
The Lego Mindstorms EV3 robots that inspired ev3dev, ev2devsim and nbev3devsim are based around a physical EV3 controller with a 300 MHz ARM9 processor, 16 MB of Flash memory, 64 MB RAM and a Linux-based operating system.
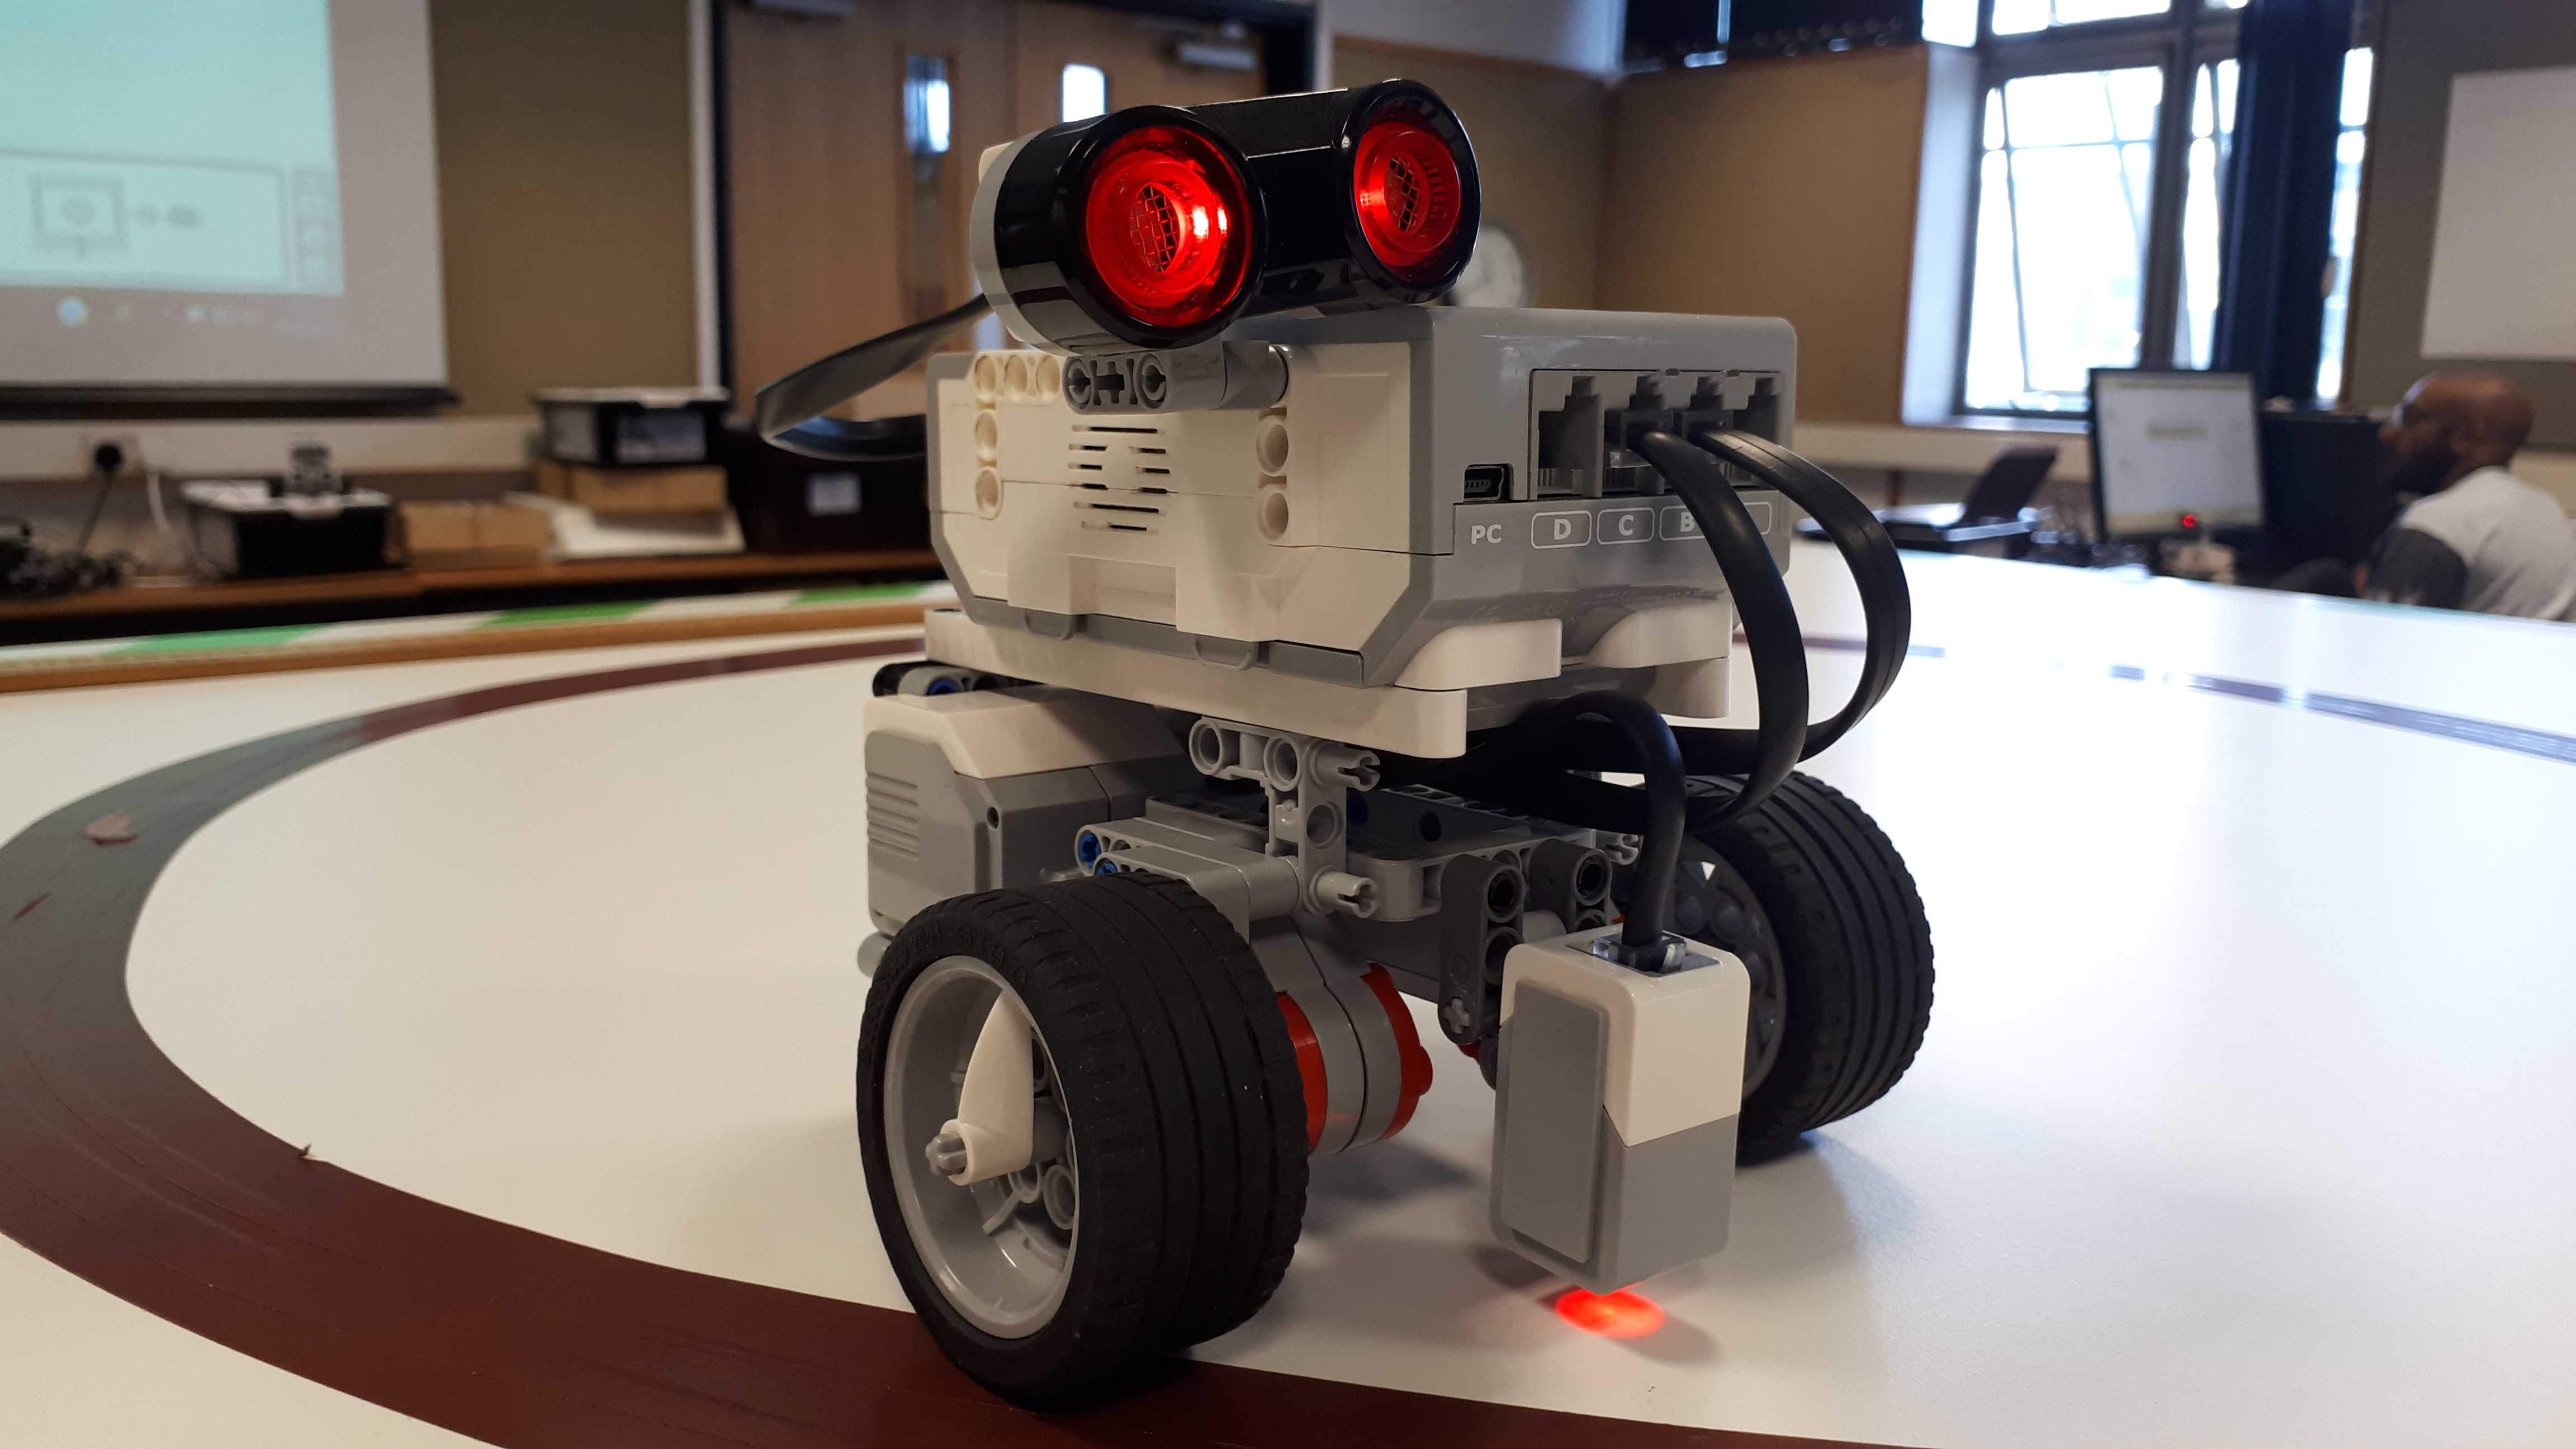
Photo credit: Nigel Gibson, OU residential school tutor
The controller is capable of supporting four motor outputs referred to as OUTPUT A, OUTPUT B, OUTPUT C and OUTPUT D. In the simulator, we define a simple two-wheeled differential drive robot using two motors configured as follows:
OUTPUT B: left motorOUTPUT C: right motor.
The EV3 brick also supports four input ports to which four different, independent sensors can be attached. These range from touch sensors, to light sensors, infrared sensors, ultrasonic sensors and even gyroscopes.
Ports are interfaces to the external world. Input sensors can be attached to the input ports, allowing information about the environment to enter the computer. Output effectors, such as motors and other actuators, can be attached to the output ports. The brick can switch such effectors on and off and control their direction and power.
The nbev3devsim simulator is capable of simulating simple robots such as the ones that can be built with Lego Mindstorms. The simulator assumes that the simulated robot works like an EV3 brick. This means that the simulator needs to know what kinds of sensors and actuators are being used, and how the (simulated) EV3 robot is configured. You will see how this is done later.
Although I have described the simulated robot in terms of a simple Lego robot, similar considerations would apply to other robotics systems. The control subsystem of any robot is usually flexible and designed to be configured with a variety of sensors and actuators.
3.3 Background – ev3dev and the original ev3devsim simulator (optional)
Lego EV3 educational robots are widely used in all levels of education, including the Open University residential school module T176 Engineering: professions, practice and skills 1.
Low-level functions provided by the ev3dev operating system are ‘wrapped’ by the ev3dev-lang-python Python 3 package. This means that a Lego EV3 robot running the ev3dev operating system can be programmed using Python code.
The ev3devsim package implements a cut-down version of the ev3dev-lang-python library to control a browser-based, 2D-simulated robot. The ev3devsim Python code runs in a Skulpt interpreter (a browser-based Python interpreter) to control a JavaScript-powered robot simulator.
The original ev3devsim simulator ran as a standalone web application that could be run, even in an offline mode, using just a web browser.
[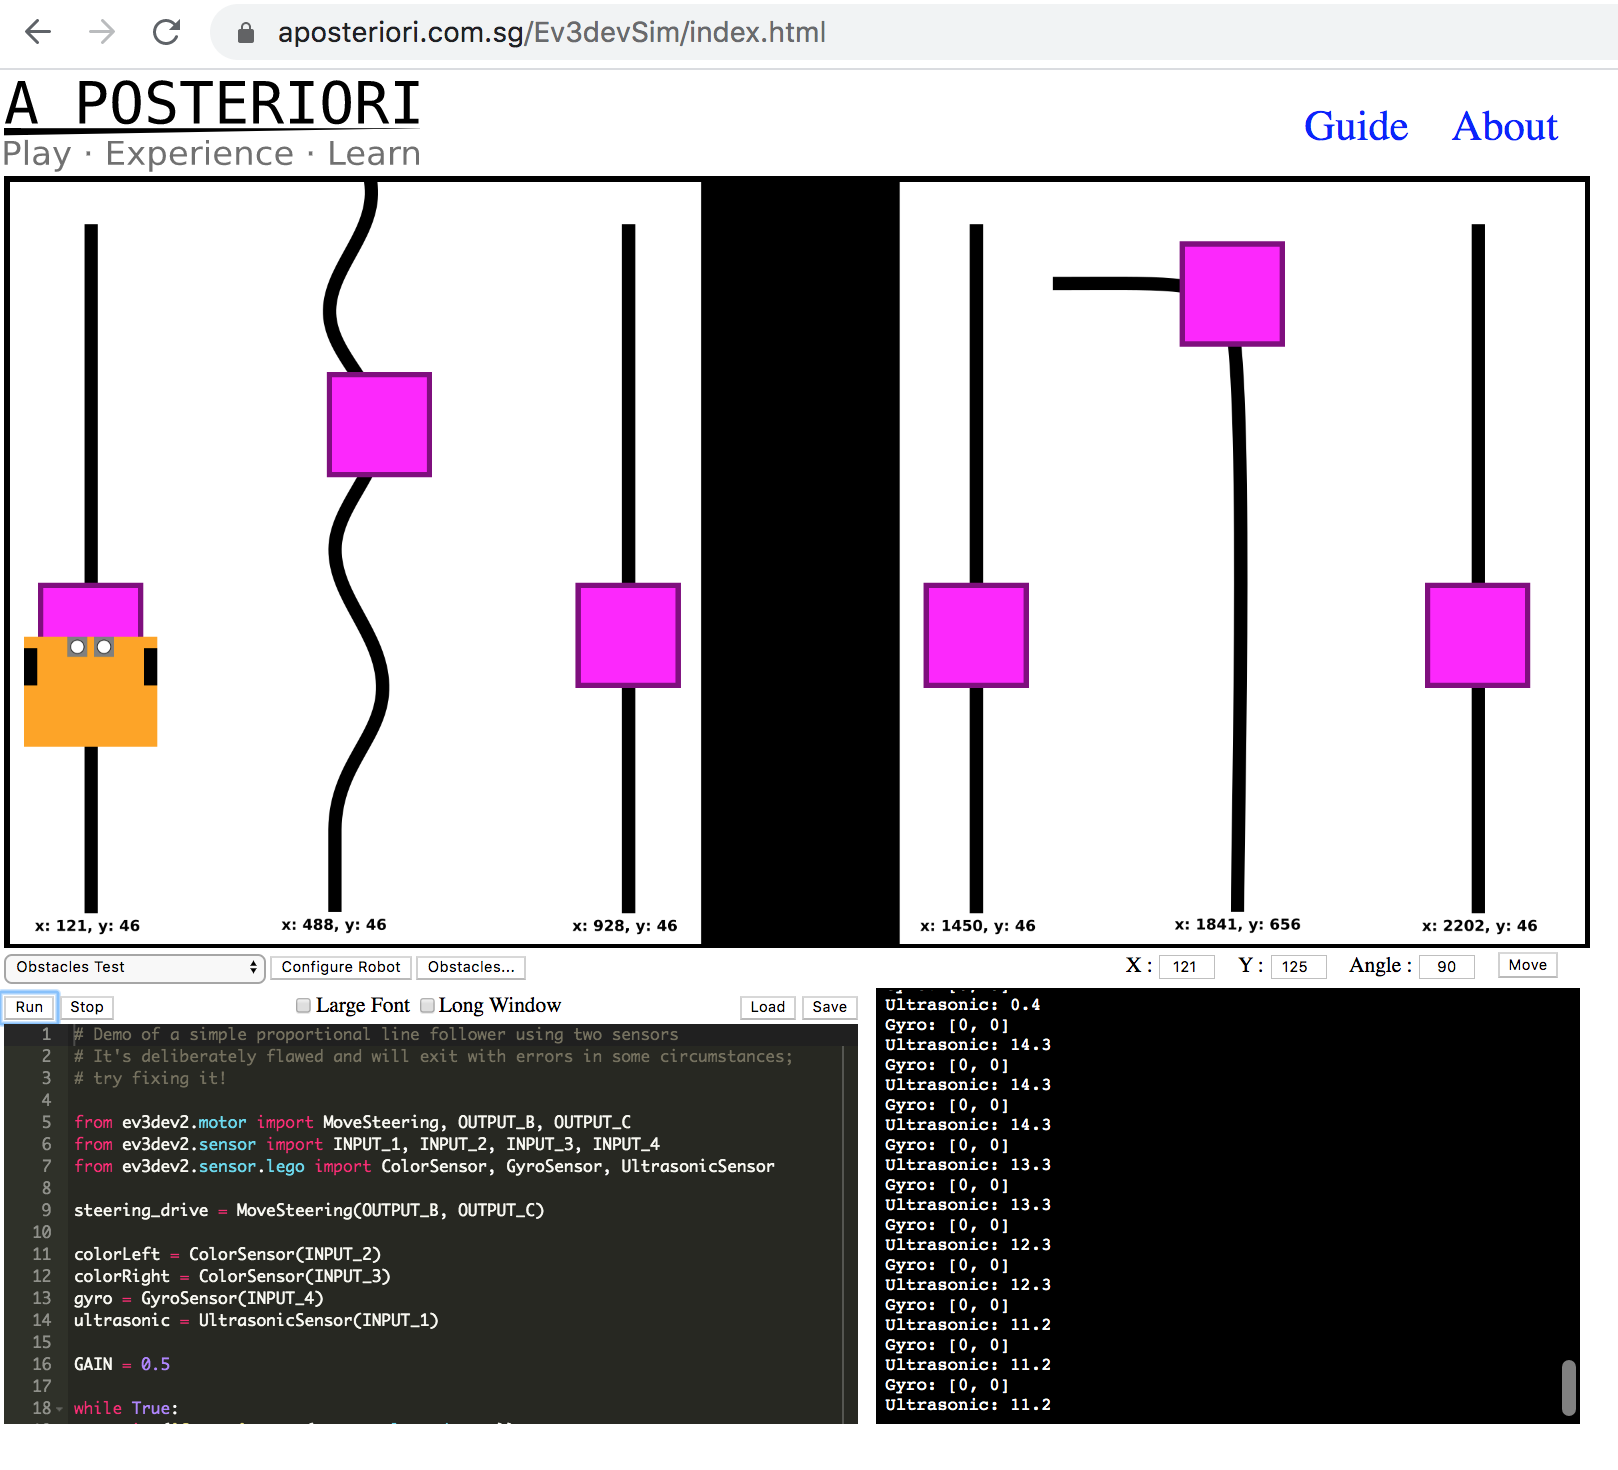
Program code is entered into the editor window and run by clicking the simulator Run button. Program files can be saved from, and loaded into the program editor. An output window displays messages sent from the program, such as sensor log values, as well as error messages if the program throws an error when it is run. A range of predefined worlds can be loaded into the simulator, as image files, from a drop-down menu. Obstacles can be added to a world using a configuration file. The robot can be configured via a configuration menu and if required moved to a specified location.
The nbev3devsim package builds on the original ev3devsim to provide an ipywidget that embeds the simulator in a Jupyter notebook. The simulated robot can be programmed using code downloaded from notebook code cells. Sensor data logged within the simulator can be exported to the notebook’s own Python environment and analysed using the full power of Python’s wide range of charting and data analysis packages.
Whilst the original ev3devsim simulator runs without any software requirements other than a modern web browser, the nbev3devsim approach does require the availability of a Jupyter notebook environment. Although this increases the complexity of the software environment, it does provide several benefits:
instructional material can be provided within a notebook to support each programming activity
data retrieved from the simulator can be analysed and charted in the notebook kernel context (for example, using Python or R)
the notebook environment provides a read-write environment within which you can make your own notes and annotations, as well as keep a record of the various steps taken to develop any particular robot control program.
3.4 How the simulator relates to the notebooks
The simulator we are using is created as an interactive ipywidget that is embedded within a Jupyter notebook.
The simulator runs as a JavaScript program in the browser tab associated with the notebook the simulator is embedded in. The simulator has various settings that can be configured within the simulator user interface, or from the notebook commands that invoke it.
For more technical details (optional), see the 99.1 nbev3devsim notebook architecture notebook in the 99. Technical Appendices notebook directory.
The simulator can be loaded into the notebook environment with the following code commands:
from nbev3devsim.load_nbev3devwidget import roboSim, eds

%load_ext nbev3devsim
When the simulator is loaded, the presentation of the notebook is adjusted to shift the notebook content to a column at the left of the screen, with the simulator in a resizable, draggable widget that pops up on the right-hand side of the screen.
You can click on the right-hand edge of the notebook column and drag it to the right or left to make the column wider or narrower respectively.
3.4.1 Activity – Load the nbev3devsim simulator into the notebook environment
Run the code cell below to load in the simulator:
from nbev3devsim.load_nbev3devwidget import roboSim, eds

%load_ext nbev3devsim
Code is ‘downloaded’ from a code cell in the notebook to the simulator by running the code cell with some special IPython magic in the first line of the cell.
You can also get code into the simulator by highlighting and copying the code (without the IPython magic line) and then clicking the Paste button in the Code display panel in the simulator.
3.4.2 Activity – Downloading code to the simulator and running it there
Run the following code cell to download the code to the simulator. You may need to reposition and resize the widget to see the simulated robot in the simulator world view at the bottom of the widget.
Note that a cell block magic identified by a double percent sign (%%) MUST be placed on the first line of the code cell.
Click the Run button in the simulator to run the downloaded code there. The robot should drive forwards a short distance and then stop.
%%sim_magic_preloaded

# Drive the robot forwards a short distance
tank_drive.on_for_rotations(SpeedPercent(50), SpeedPercent(50), 2)
tank_turn.on_for_rotations(-100, SpeedPercent(75), 2)
You will have an opportunity to explore the nbev3devsim simulator in a bit more detail in the next notebook.
3.4.3 Configuring the simulator layout
The simulator environment includes a range of user controls that can be used to configure the layout and view of the simulator user interface, as well as controlling operations performed within it. These include positioning the simulated robot, loading in different simulator backgrounds, loading obstacles into the simulated world, displaying status messages from the robot and dynamically charting logged sensor readings, as well as many other features.
You will be introduced to these in more detail as and when they are required.
A reference guide to the nbev3devsim user interface is also provided in the 99.2 nbev3devsim user interface notebook in the 99. Technical Appendices notebook directory.
3.4.4 Creating and saving your own robot program code
The activities have been created within Jupyter notebooks using the embedded simulator widget. In many activities, you will have the opportunity to create and run your own programs to run within the simulator, as well as within the notebook’s own Python coding environment.
Whilst it is possible to download and save code files loaded into the simulator, and load code back into the simulator from a saved file, we will generally download code from within a code cell to the simulator.
Saving the notebook will thus keep a record of the code you have downloaded and run in the simulator, although as with the state of the notebook Python environment, the internal state of the simulator is not saved when you save the notebook.
3.5 Summary
In this notebook, you have been introduced to the nbev3devsim simulator and its predecessor, the ev3devsim simulator. The ev3devsim simulator was itself inspired by ev3dev, a Linux-based operating system for the Lego Mindstorms EV3 computer brick.
The nbev3devsim simulator represents a simple simulator environment that can be used to model the behaviour of real-world EV3 controlled mobile robots, such as the ones used in Open University engineering residential schools.
In the next notebook, you will have an opportunity to explore how to configure and use the nbev3devsim simulator.
But first: would you like to create your own summary cell for this notebook, and colour it to highlight it as your own work?